
Asset Details
Key Points to Assets Tile
Designated area where users can go to view their assets.
Enables users to view/edit all information relating to an asset.
Attributes, History, Attachments, Notes, Relationships.
Allows users to Create, Import, Export Asset data.
Search for a unique asset or group of assets.
Use Quick or Advanced Search to locate assets. Opt to search through All Assigned Accounts or a specific one. Input any asset info in the search box, relevant to your selected account. Active assets appear vibrant, while inactive ones are faded.
Search Assets
Quick Search
Enter search criteria in the Search Assets field.
Select Enter on your keyboard or select the Search icon (blue magnifying glass) to perform the search.
Advanced Search
For more specific criteria and multi‐faceted searches, use the Advanced Search. You can combine keywords with operators such as AND or OR to produce more relevant results.
For example, you can search for assets where "Unit ID" contains "Equipment 1" AND "Asset Class" equals "Engine.”
Click Advanced.
The Advanced Search box appears.
Enter in search criteria in the Advanced Search area. Select the field to match from the drop down, and then specify the rule.
Add additional criteria by clicking Add rule.
Click Search to perform the search.
To save the search, select the Save button and choose Save As to name the search.
To use a saved search, select the Saved Search drop‐down and select the desired search to run.
Create Asset
Navigate to the Asset tile.
Select the desired account for the Asset.
Select Create in the upper right corner.
Choose the desired asset class and select Create.
Enter asset attribute information and select Save.
Security Right Required
Create Assets
Additional Details:
Asset ID: Generated Automatically. The asset ID is used to identify an asset when searching for it.
Account: The account is already be chosen and nothing needs to be done to this section.
Asset Class: In the previous section you chose an Asset Class. If the wrong Asset Class was chosen, you can change.
Note: Certain aspects are controlled by asset class, such as equipment class. See section above for more information.Asset Description: The Asset Description is used to describe the Asset for future searching.
Attributes: Predefined Attributes of the asset. Fill in as needed. These will contain fields such as Lubricant, manufacturer, model, service type, etc...
Edit Asset
Search for the asset.
Select the asset from the search results.
Select Edit in the upper right corner.
Make any required changes to the asset.
Click Save to save changes or Cancel to discard changes.
Delete Assets
Users with edit rights may delete assets with no work history associated with the asset.
Once deleted, the record is not recoverable.
Navigate to the Accounts tile
Use the search bar to find the account for the asset you wish to delete and select that account.
On the Account Details page, select the three lines next to the Edit pencil and choose Delete Assets.
Select the assets to be deleted, then select Save.
Only assets with no work history will be available for deletion. Assets with work history will be grayed out and have an asterisk (*) beside the asset, indicating it cannot be deleted.
Change Asset Class
Find the Asset that needs to be moved.
Select the Asset.
Select the Edit button.
Change the Asset Class by clicking on the Asset Class box and selecting the new Asset Class.
Select Save at the bottom of the screen.
Security Right Required
Can Change Asset Class on Asset
Asset Information
After moving an Asset to a different Asset Class, a list with the new attribute information will show up. The information will not automatically populate from the old Asset Class to the new one. To add this info, the user should select 'Edit' on the Asset and complete the 'Attribute' section under details. After saving, users can view old and new attribute data under the Asset's 'Details'.
Copy Asset
Select the Assets tile from the Landing Page.
Use the search bar to find an existing user to copy and select that asset.
Click the vertical ellipses and select Copy Asset.
OR
On the Asset Details page, select the Pencil icon (edit).
Scroll to the bottom of the Asset Editor and select Copy.
On the Asset Editor page, edit the desired asset attribute information and select Save.
Move Assets via UI
Select the Assets tile from the Dashboard.
Use the search bar to find an existing asset to move and select that asset.
On the Asset Details page, select Edit.
Scroll to the bottom of the Asset Editor and select Move.
Select the New Account in the Move Asset screen.
Select Yes to confirm the asset move.
Users can select to move the asset by itself or with any child assets to the new account.
Users can delete asset history when moving an asset to a new account by checking the Delete History checkbox.
Select Save to complete the asset move.
Note: Users may only move assets to accounts to which they are assigned.
Troubleshooting
If you receive an error such as "This asset is part of an assembly and cannot be moved":
Ensure the asset being moved is not a child asset of a different asset.
If it is a child asset, the parent asset will need to be moved.
Alternatively, the child asset can be disassociated from the parent asset.
IMPORTANT: Please check with Technical Helpdesk before completing this process!
First, ensure that this asset NEEDS to be removed from the parent asset.
Open the parent asset and scroll down to the Relationships panel. You should see the child asset listed underneath the parent asset:
Next, click the pencil icon in the top-right corner of the Relationships screen:
Hover over the asset you would like to remove. A red X will appear to the right of the name of the asset.
Click the red X to remove the child asset from the parent asset.
Now, you should be able to move the asset to a different account.
Move Assets via Excel Add-In
Open up the Excel Add-In (Select link if download hasn't been completed)
Select Get Assets
Import Assets
Navigate to the Assets tile.
Select Import, and then Download a Blank Template to import new assets.
After clicking 'Download a Blank Template', choose the asset class you're importing. Check the box and select Submit.
To update existing assets, use an asset export and update the necessary data.
Complete the import template with valid inputs and save as a .xlsx file. An existing asset export may help in completing a blank template.
Navigate to the Assets tile and select Import.
Select Choose File to select the Excel (.xlsx) file that was created above.
Select Upload to load the file.
You will receive a notification that the import has been scheduled. You will also receive an email with an error log once the job is completed. The job status can also be found on the Dashboard. Review the error log to confirm that the assets are imported successfully.
Importing is limited to a maximum file size of 5000 rows. If you have more than 5000 assets to import, divide your file into two or more files.
Only valid inputs can be imported back into the system. This includes the exact spelling of drop-down selections.
Security Rights Required
View Assets; Import Assets
Export Assets
Users can export their asset search results into an Excel file. Export results are emailed to the user once the export is complete.
Navigate to the Assets tile.
Use the search features to find desired assets.
Select Export to export the current search results.
Select Submit to confirm the export.
You will receive a notification to await an email that the download is ready:
An email with a link to the download will be sent to the user's email inbox.
Select the bell (or gear icon if jobs are in progress) in the top-right of the screen.
Once you click that button, you should see an overlay-window slide from the right of the screen.
This screen will show any jobs currently running or completed.
Select Job Status for the options of All, Incomplete and Complete.
Likewise, the Date Range options include Last 24 Hours, Last 7 Days and Last 180 Days.After a few minutes, click the "Refresh" button to be sure the current status is accurate.
Once the job is complete, the progress bar will be at the 100% mark:
The report can now be downloaded by clicking where it reads Click Here to Download.
The user will also receive the exported information via email.
Attachments
Go to Asset Details.
Scroll down to Attachments panel.
Right click on the asset folder.
Create- Create new sub folders.
Delete- Delete folder or attachment.
Edit- Edit or Rename attachment (the folder names may NOT be edited).
Upload- upload additional files.
Create Assets Relationships
The recommended approach to creating Parent/Child asset relationships in MLA is to create an Equipment (Non Sampling point) asset and build the relationship between the sampling points and the Equipment. The steps to create an Equipment asset and create asset relationships back to the equipment in MLA are outlined here.
Users also have the ability to create relationships between sampling points if preferred, which is outlined below.
Search and find the Asset that you would like to create a relationship to other assets with.
Select the Asset.
Scroll down to the Relationships section.
Select the Pencil in the upper right-hand corner to Edit.
Select the + Add button.
Use the asset search to find the asset that you want to tie to this asset.
Select the asset.
A confirmation dialog will appear: Are you sure you want to assign or change the parent of the selected asset?
Select OK to confirm the child relationship assignment for the selected asset.
The asset appears as a child in the relationship tree on the Asset Relationship tabs.
Security Right Required
Edit Assets
Asset Layout
The Layout when viewing a specific asset are as follows:
Edit: Button in the top-right corner of the screen. Full Details of the Asset including attributes and Asset ID may be edited here.
Description of the Asset: This section shows basic information such as the name, account, asset class and Lubricant.
Attributes: As mentioned in the "Create an asset" section above, this lists all the details about this asset.
Work History: Allow the user to review previous work completed against this asset.
Timeline: User can add Notes, Photos, Images, Links to the timeline
Attachments: Quickly and easily access all attachments. Folders exist for easy organization.
Relationships: Manage and review the parent/child relationships and schematics for this asset.
Asset History: Review all actions changes/updates etc...
Routes: If this asset is associated with any Routes they will be listed
Enroll Asset in Sample Compliance
To Enroll
Open the asset and select Edit.
Scroll to the bottom and select the Sample Frequency cell.
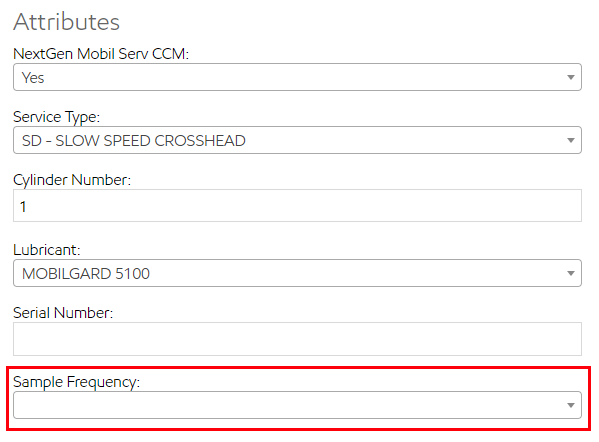
Choose interval periods: 1, 3, 6, or 12 months.
For a mass change, you can use the Excel Add-In.
Save
View the Report
Open the BI Reports tile.
Select Sample Points from the reports dropdown.
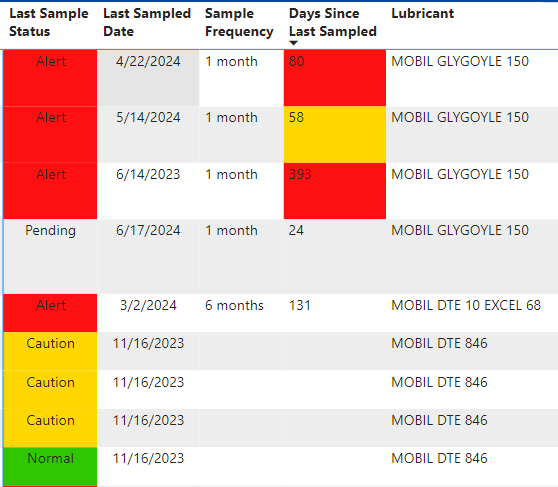
Check column Days Since Last Sampled.
Logic:
The Days Since Last Sampled value will turn red if:
If the days since last sampled is >30 days over the sample frequency period.
or if a RICE NESHAP asset is >30 days since the last sample
The Days Since Last Sampled value will turn yellow if:
If the days since last sampled is in between 1 and 30 days over the sample frequency period.
The Days Since Last Sampled value will show no color if within compliance.
Data in Power BI is updated at 12pm EST daily, meaning any modifications to assets will be visible in Power BI on the subsequent day.
RICE NESHAP Engine Assets
RICE NESHAP is an acronym for Reciprocating Internal Combustion Engines National Emissions Standards for Hazardous Air Pollutants. The U.S. Environmental Protection Agency (EPA) adopted national emission standards for hazardous air pollutants (NESHAP) in 2010.
The regulations apply to:
stationary compression ignition (CI)
spark ignition (SI) reciprocating internal combustion engines (<500hp) at area and major sources of hazardous air pollutants (HAPs).
As part of the analysis process alert limits are applied aligned with the EPA guidelines. Ensure your User Profile’s email preferences are properly defined to receive alert notifications.
Register a RICE NESHAP engine asset:
When registering your engine to apply the RICE NESHAP alert limits, please ensure to complete the designated fields noted below.
Spark Ignited Engines (Natural Gas or Landfill Gas)
From Assets page, Create an Asset.
Select Asset Class – Engine - Natural Gas or Engine – Landfill Gas.
Complete the asset registrations attribute fields.
For Cycles asset attribute, select either 2 CYCLE - RICE NESHAP-USA ONLY or 4 CYCLE - RICE NESHAP-USA ONLY.
Save your asset registration.
When sampling, submit your sample using an Enhanced (blue capped) Mobil Lubricant Analysis sample bottle.
LIMITS - Sample result alert limits for RICE NESHAP spark ignition engines:
Test Parameter | Alert Limit for RICE NESHAP spark ignition engines |
|---|---|
Total Acid Number (TAN) | Increased by more than 3.0 milligrams potassium hydroxide per gram of typical new oil TAN |
Viscosity | Change by more than 20 percent of typical new oil viscosity |
Water | Percent water content (by volume) is greater than 0.5 |
Combustion Ignited Engines (Diesel or Gasoline)
From Assets page, “Create” an Asset
Select Asset Class – “Engine”
Complete the asset registrations attribute fields
For “Fuel Type” asset attribute, select either “DIESEL - RICE NESHAP-USA ONLY” or “GASOLINE -RICE NESHAP-USA ONLY”
5.“Save” your asset registration
When sampling, submit your sample using an Enhanced (blue capped) Mobil Lubricant Analysis sample bottle.
LIMITS - Sample result alert limits for RICE NESHAP combustion ignition engines:
Test Parameter | Alert Limit for RICE NESHAP combustion ignition engines |
|---|---|
Total Base Number (TBN) Diesel Engine | <30 percent of the total base number of the oil when new |
Total Acid Number (TAN) Gasoline Engine | Increased by more than 3.0 milligrams potassium hydroxide per gram of typical new oil TAN |
Viscosity | Change by more than 20 percent of typical new oil viscosity |
Water | Percent water content (by volume) is greater than 0.5 |
Corrective Action
According to RICE NESHAP standards, if any of the above limits are exceeded:
Oil must be changed in the RICE:
within 2 business days of receiving the results of the analysis
or before operating the RICE, whichever is later.
The owner or operator must record program-analyzed parameters, analysis results, and engine oil changes.
Oil analysis program must be part of the maintenance plan for the engine.
Non-Sample Point Assets
Within MLA, Non-Sample Point Assets refer to asset types that are part of the asset management system but are not directly sampled. This currently includes:
Equipment: Groups of related assets structured as an Equipment Class (e.g., engines, compressors, gearboxes).
Lube Chart: Assets related to lubrication requirements and schedules.
These non-sampling assets help organize and manage equipment-related information, supporting maintenance and operational oversight.
Key Notes
Sampling is performed only on lab approved asset types (Engine, Hydraulic, Compressor etc.), not on the Equipment or Lube Chart asset themselves.
The Equipment feature is currently available for PCI Business Lines and is coming soon for Marine business lines.
Managing Equipment (Non-Sample Point)
What is Equipment in MLA?
Equipment is a hierarchical grouping of individual components related to a single piece of machinery or system (e.g., an engine plus its parts). This hierarchical structure reflects manufacturer categorizations and facilitates asset organization.
An Equipment asset cannot be sampled directly.
Creating Equipment
Select the Asset tile.
Choose the appropriate Account from the dropdown.
Click Create > Equipment > Create.
Fill in details such as manufacturer, model, and serial number.
Click Save.
Adding Components to Equipment
Access the Asset tile and search for the equipment asset.
Open the equipment’s details.
Scroll to Relationships and click the pencil icon (edit).
Click Add, then search for child component assets (using Unit ID or other identifiers).
Select assets and add them. (You must be assigned to the account.)
Viewing the Equipment Hierarchy
Select the Asset tile and find the equipment.
Open its editor and scroll to the Relationships section to see linked components arranged hierarchically.
Lube Chart Assets (Non-Sample Point)
What is Lube Chart asset?
The Lube Chart is a non-sample point asset type designed to track lubrication requirements, schedules, and related information for equipment. Contact your Exxon Mobil rep for more information on creating.
A Lube Chart asset cannot be sampled directly.
Searching and Viewing Non-Sample Point Assets
Basic Search
Select the Asset tile.
Uncheck ‘Sample Points Only’ to include non-sample point assets in your search.
Enter search terms (asset name, ID, etc.).
Browse the results including Equipment, Lube Charts, and other non-sampling assets.
Advanced Search
Go to the Asset tile.
Click Advanced.
Enter detailed search criteria such as asset type (Equipment, Lube Chart), manufacturer, account, etc.
Click Search for filtered results.
Summary
Non-Sample Point Assets like Equipment and Lube Chart enhance your asset management capabilities by providing structured grouping and management of assets that support your sampling program indirectly. Use them to improve asset visibility, organization, and maintenance planning without affecting sampling workflows.
Archive Sample History
Select the Accounts tile from the Dashboard.
Use the search bar to locate the Account of the Asset from which to archive history.
Open the Account
Click the triple bar and select Archive History
Check the Archive option.
Enter the dates (using the Sample Date)
Select the asset(s) from which the historical sample data should be archived
Click Submit
Restore Sample History
Select the Accounts tile from the Dashboard.
Use the search bar to locate the Account of the Asset from which to restore history.
Open the Account
Click the triple bar and select Archive History
Check the Restore option.
Enter the dates (using the Sample Date)
Select the asset(s) from which the historical sample data should be restored
Click Submit