
Routes
Dashboard Tile uses
View, edit and create their routes.
Schedule batches of work orders that can be created on a strict or flexible schedule.
Order the sequence of the work to be performed.
Schedule work orders to view on a calendar.
Security Rights Required
View Routes
Description of Routes
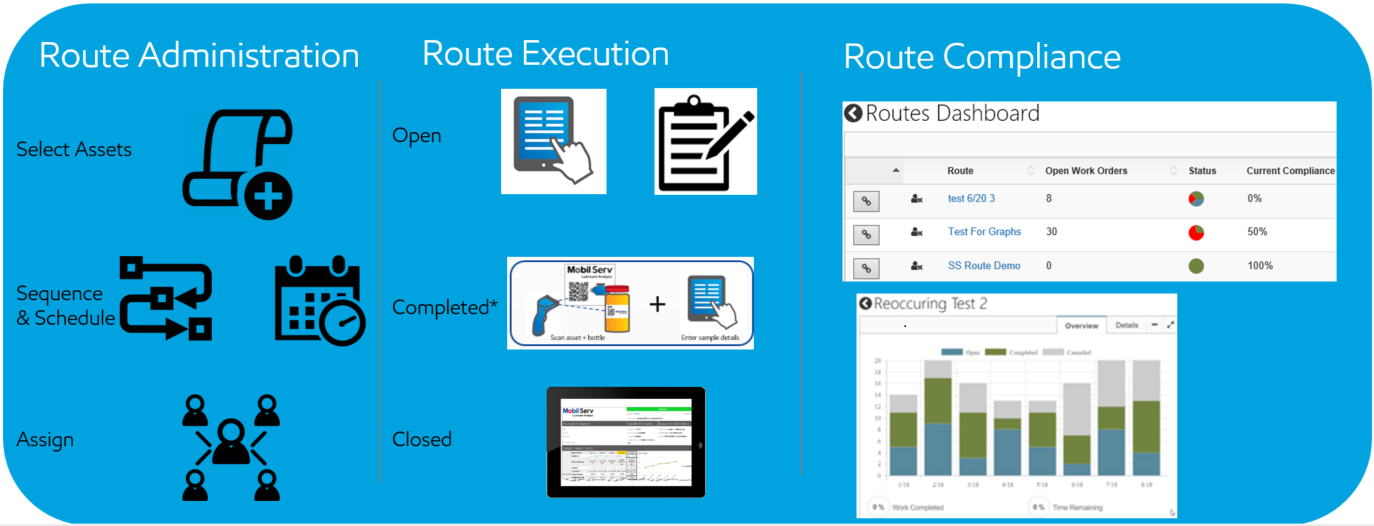
Routes enables users to efficiently and effectively perform lubricant analysis on a scheduled basis.
Route administration –easy setup and management of assets to schedule for sampling
Route Execution - requires no change to your current sampling process to leverage routes.
Work Orders automatically progress through their lifecycle, with no additional steps to manage during the sampling process
Once your sample is registered (via Scan & Go or at the laboratory) the work status will automatically change to “Completed”. When the sample results are ‘Reported’ the status will automatically change to “Closed”
Flexible options: scan and go, My Work tile, email template, or a printed route.
Route Compliance – accurate monitoring of program success via compliance reporting
Create a Route
Select the Route Dashboard Tile from the dashboard.
Select Create
Enter a Route Name and Assignee's
Choose a Schedule; click Next.
Click Add Assets.
Search for and assign assets to the route; Save.
Select sort order by drag and drop or number order.
Add additional work if desired to each asset - click the + to see additional work available.
Click Save.
Security Rights Required
View Routes
Work orders will not appear in My Events (calendar) until they are edited and saved.
Edit Route
Select the Route Dashboard Tile from the dashboard.
Search the Route’s name in the search bar or via the filters in the drop down
Click the Link to the left of the Route’s name
Click Edit
Make changes to the Route Schedule >> Click Next
Add/Edit Assets or change the sequence order >> Click Save
Detailed Steps to Create and Edit a Route
There are two ways to create a route.
From the main dashboard, click on the 'Routes Dashboard' tile, then 'Create' at the top right. Alternatively, you can select the 'Assets' tile, click on the Hamburger icon, and choose 'Create Route'.
User will be brought through a Route Creating Wizard
Schedule
Route Name
The user must input a route name in order to create the route. Route names are not specific and can be repeated. This is a required field.
Work Order Description
The user can enter a description of the route that will appear on Work Orders.
Type
Select the type of work is being done by the Route. ( PM, Repair, Investigation etc...) This is displayed on the work order.
Priority
Select a priority for the route. (Minor, Major, Critical etc...) This priority is displayed on the work order.
Assignees
Search for assignees by typing in at least three letters and selecting the desired assignee from the results. Multiple assignees can be assigned to the same Route. This is a required field.
Tags
Tags can be added to a route by typing two or more letters into the Tags. Multiple tags can be added to a Route. These tags are applied to every work order and show up in the Works Tile.
Scheduling
None
Work Orders show up as due immediately.
Scheduled
Work Orders are created and marked as “Open” until the “Start” time has passed. After that time it is considered “Due”. Work Orders can be edited to be due at any time in the future or on the same day.
Reoccurring
Hourly: Work Orders can be created and scheduled on an hourly basis. Selecting The number of occurrences can be determined by a fixed number, date or be infinite.
Daily: Work Orders can be created and scheduled on a daily basis. Reoccurring from due date creates the next work order at the same time the next day. The number of occurrences can be determined by a fixed number, date or be infinite.
Weekly: Work Orders can be created and scheduled on a weekly basis. Reoccurring from due date creates the next work order for the same time the next week. It can also occur on the same day of the week. The number of occurrences can be determined by a fixed number, date or be infinite.
Monthly: Work Orders can be created and scheduled on a monthly basis. Reoccurring from due date creates the next work order at the same time the next month. It can also occur the same day of the week. The number of occurrences can be determined by a fixed number, date or be infinite.
Yearly: Work Orders can be created and scheduled on a yearly basis. Reoccurring from due date creates the next work order at the same time the next year. The number of occurrences can be determined by a fixed number, date or be infinite.
Hide Until Next Occurrence: Hides the route from the calendar until its start date and time have passed.
Cancel open work orders on next occurrence. Cancels the previous Work Order if it was not completed upon creation of the next Work Order. Otherwise, the incomplete work will remain as due on the asset.
Add Assets
Searching
Assets can be searched for using either a quick search or advanced search. The Assets selector will allow the user to select a parent, a parent and children, one asset individually, etc. User can ADD ALL or Remove Selected or simply remove one asset from the list on the left. When assets are added they will appear in the Assigned Assets column on the left. The search bar at the top of the assigned assets allows the user to ensure that particular assets are added.
Sorting
Workflows can be sorted by dragging and dropping into the correct sequence. Also, by adjusting the number found at the right side of the asset. This sequence is adjusted when the Apply Sort Changes button is selected. The sort order is used to determine the sequence of work orders sorted by "Sequence" on the Routes Dashboard.
Workflows
Additional workflows can be added to an asset's Work Order by selecting the plus sign next to the Asset.
Click to Save the Route
Route Dashboard
The Route Details Page shows all of the work orders and details for a specific Route.
Overview
Work Order Status
This area shows the user a pie chart indicating the percentages of "Open", "Due" and "Completed" work.
Current Compliance
This displays the percentage of work done in the last interval of the route.
Total Compliance
This displays the percentage of total work completed in the route.
Total Compliance Rate
This area displays a bar for each time a route is completed for a maximum of eight routes. The Graph will show a numerical value for each category when hovered over.
Work Orders
Users can view, filter and sort work orders in the Work Orders section on the right side of the dashboard. The filters are contained in the drop-down menu next to the Work Orders title. Filter options include Scheduled Date, Sequential planned order, Open, Completed, Closed, Canceled, and options to view the current interval only.
View Work Orders
Select the Routes Dashboard Tile from the Dashboard.
Search the Route’s name in the search bar.
Click the Link to the left of the Route’s name.
In the Work Orders section, select the Hamburger of the desired asset.
Select View Work Order.
Viewing a Work Order redirects the user to a details page about the Work Order and the Asset. On this page, users have the ability to Edit, Complete, or Cancel the Work Order. This page also includes a timeline of past changes made to the work order.
Edit Work Orders
Select the Routes Dashboard tile from the Dashboard.
Search the Route’s name in the search bar.
Click the Link to the left of the Route’s name.
In the Work Orders panel, select the Hamburger of the desired asset.
Select Edit Work Order.
Add a description >> Edit the Priority and Type.
Change the Work Order’s Start Date and Start Time.
For a successfully edited work order, the desired date and time must fall within the current route period.
A daily route can be scheduled only between its current start and the next occurrence. Scheduled work orders are free to be scheduled any time in the future or on the current date.
Save.
To appear separately in "My Events", a work order must be edited. This applies to both the Routes Dashboard and Details pages. In order for an edit to be valid, it must fall within the current route period. Furthermore, work orders can not be scheduled in the past. These rules only apply to work orders that are on a reoccurring schedule. Scheduled work orders can be edited to any date that is not in the past.
Complete Work Orders
Select the Routes Dashboard tile from the Dashboard.
Search the route’s name in the search bar.
Click the Link to the left of the Route’s name.
In the Work Orders panel, select the Hamburger of the desired asset.
Select Complete Work Order.
Complete the Work Order.
Save.
Cancel Work Orders
Select the Routes Dashboard Tile from the Dashboard.
Search for the Route's name in the search bar.
Select the link to the left of the Route's name.
In the Work Orders panel, select the Hamburger icon for the desired asset.
Choose Cancel Work Order.
Confirm by selecting Yes.
Canceling a work order will mark its status as canceled.
Canceled work orders can still be viewed and reopened on the Work Orders Details page.
My Events / Calendar
Calendar
The Calendar helps you view and manage work orders.
Views
Switch between monthly, daily, and agenda views. You can filter work by assignee. Work Orders only show on the calendar if edited and saved to a new date or time. Use arrows to navigate.
Colors
Colors indicate Work Order status. It reflects both in the Work Order section and Calendar:
"Route" Purple: Entire route occurrence with a number indicating total Work Orders. Changed Work Orders show separately.
"Open" Blue: Future start date.
"Due" Red: Past start date.
"Completed" Light Green: Completed Work Orders.
"Closed" Dark Green: Completed and closed Work Orders.
"Canceled" Black: Canceled Work Orders.
Scheduling Work Orders Only editable routes can be scheduled separately. To add a recurring Work Order to the Calendar, choose a time within the current route period. For example, a daily route starting at 1:00 PM on 9/12 can only be scheduled before 1:00 PM on 9/13. Future Scheduled Work Orders can be set anytime.
Timeline
Users can see route changes, make notes, attach files, and create websites at the page end.
Print Asset Labels
Select the Routes Dashboard Tile from the Dashboard.
Search for the Route's name in the search bar.
Select the link to the left of the Route's name.
Choose Print.
Pick the Label Type.
Select Print again.
A popup will appear, redirecting the user to a PDF with the Asset Labels.
Email Asset Labels
From the Dashboard, select the Routes Dashboard Tile.
Search for the Route's name in the search bar.
Select the link to the left of the Route’s name.
Choose Email.
A window will open to input recipients, subject, and message.
Select Send to dispatch the asset labels as a PDF.
Work Order Email Settings
Navigate to the User Details page to find the Work Orders panel.
Hover over the Work Orders panel. A pencil icon will appear in the top right corner.
Select this icon to edit email notification settings.
Various email notification options will appear:
Emails for open work orders
Emails for completed work orders
Emails for due work orders
Choose the email notifications that suit your needs.
Select Save to apply these changes.