
Interpret Sample Analysis Report
Interpret Sample Analysis Report
Mobil Lubricant Analysis provides an unparalleled knowledge of ExxonMobil lubricants through decades of experience and close OEM relationships. Our strong heritage of hands-on application expertise provides you a reliable analysis.
Overview
The overall assessment focuses on three areas that help identify:
equipment condition
contamination
lubricant condition
The report assigns one of the following color-coded ratings:
🟥 Alert – Conditions exist that exceed acceptable limits or require corrective action. Steps should be taken to confirm and correct the condition.
🟨 Caution – Conditions are present that may require monitoring or diagnosis to minimize impact on equipment and lubricant performance.
🟩 Normal – Equipment, contamination, and lubricant conditions are within an acceptable range.
The report also includes comments on potential problems, possible causes, and recommended follow-up actions.
Limits applied to each sample can vary based on your asset’s registered manufacturer, model, application and lubricant-in-service. In addition, the view process considers all report data and may correlate multiple results to determine an abnormal condition.
Accessing Reports
Sample reports can be viewed through the Assets tile or the Sample Reports tile.
Sample Reports View:
Navigate to the Sample Reports tile on the Dashboard.
Set your search criteria in the designated fields.
Click Refresh to view results.
Select Report next to the desired search result.
For multiple reports, select multiple rows and click the View/Print tile.
Assets View:
Navigate to the Assets tile on Dashboard.
In the Asset Search page, select the account of the sampled asset.
Use the search bar to find the desired asset.
Select Report in the Work History section corresponding to the desired assets.
To access multiple reports at one time, view from the Samples Reports Tile.
Understanding the Report
Understanding the contamination, equipment condition and alerted conditions.
Contamination
Three types of contaminants could be present:
Built-in contamination
Self-generated contamination
External ingression
Understanding these sources helps in taking corrective action and improving equipment reliability.
The following elements can help identify contamination:
.png?inst-v=71dc52cd-acdd-41e3-afaa-da1ecfb69f56)
.png?inst-v=71dc52cd-acdd-41e3-afaa-da1ecfb69f56)
Use this chart to better understand common contaminants, their effects and remedies.
.png?inst-v=71dc52cd-acdd-41e3-afaa-da1ecfb69f56)
Equipment Condition
Knowing what the analysis report is identifying can provide valuable information about the condition of your equipment. Trend monitoring can assist in pinpointing the time when a problem began, helping you trace its causes and formulate solutions.
.png?inst-v=71dc52cd-acdd-41e3-afaa-da1ecfb69f56)
Typical equipment component metals
.png?inst-v=71dc52cd-acdd-41e3-afaa-da1ecfb69f56)
.png?inst-v=71dc52cd-acdd-41e3-afaa-da1ecfb69f56)
.png?inst-v=71dc52cd-acdd-41e3-afaa-da1ecfb69f56)
Assess and Confirm Alerted Conditions
Access equipment condition:
Interpret your analysis results - Understand your equipment’s operating conditions and its lubricated components. Note that the limits applied to each sample can vary based on your asset's registered manufacturer, model, application, and lubricant-in-service.
Monitor the sample trend - Identifying trends is important for understanding oil analysis results. Include critical equipment and maintenance information (e.g., date sampled, hr/mi/km, makeup oil, etc.) with your sample submission. This data allows for normalization of the analysis trends to enhance your assessment. Review the entire report – Proper condition assessment requires a complete review of the report. Changes in equipment condition typically coincide with the presence of contamination or changes in lubricant properties.
Review the entire report - A complete report review is necessary for a proper condition assessment. Changes in equipment condition typically coincide with the presence of contamination or changes in lubricant properties.
Before replacing or shutting down equipment, confirm alert analysis conditions considering the following steps:
Review maintenance/operator records to identify the condition.
Validate the condition with other equipment monitoring tools such as inspections, vibration analysis, or thermography.
Use an on-site analysis test designed for the alerted condition.
Submit another sample to the laboratory for analysis.
Trend Rating
Traditional test alarms warn when the level of a test result exceeds a preset limit. In contrast, the trend alarm, displayed in the 'Trend Rating' field of the report, uses a complex algorithm. This helps identify significant changes in the test trend before the results surpass the absolute limits. These alarms can be considered as an early warning to a potential condition. They can also indicate a severe change in asset condition due to the degree of change.
Absolute alarms versus Trend alarms.
.png?inst-v=71dc52cd-acdd-41e3-afaa-da1ecfb69f56)
%20(3).png?inst-v=71dc52cd-acdd-41e3-afaa-da1ecfb69f56)
Troubleshooting questions
How do I know trending was applied?
Trend Rating will show as Normal, Caution, or Alert status on the report if the requirements for trending are met.
A sample comment for trending will appear on the report for a caution or alert status.
Why didn’t trending apply to my report?
Asset or Account is set to disabled settings for trending.
A non-numeric result was reported.
How do I disable trending?
Use the asset or account editor to disable Trend Analysis.
Disabling Trend Analysis on the account will disable it for all assets under the account.
My report received a Caution or Alert status for Trend Rating, now what?
A cautioned Trend Rating means that a change in the test trend has been identified, but the result is still within the MSLA absolute limits.
An alerted Trend Rating means that a significant change in the test trend has been identified, and the results are now also outside of the MSLA absolute limits.
My trend rating is blank; what does that mean?
A condition for trending was not met and was unable to be applied. This could be due to any of the following:
Result was non-numeric.
Account or Asset was switched back to disabled for Trend Analysis
There were not enough samples with these tests to establish a trend (Minimum 3 historical + current)
Most recent historical sample is older than 24 months.
What tests have trending applied to them for the Trend Rating status?
Aluminum (Al), Chromium (Cr), Copper (Cu), Iron (Fe), Nickel (Ni), Lead (Pb), PQ Index, Tin (Sn), Titanium (Ti)
Note: test parameters may not be reported on all reports
Silver (Ag) will also have a trend alarm for Engine, Steam Turbine, and select Marine applications.
Oxidation and Nitration – Direct Trending will have trend alarms for select applications.
Lubricant Condition
A lubricant performs a variety of functions in your application. Maintaining the physical properties of the lubricant is important to extending the equipment’s reliability and the life of the lubricant. The most important functions include friction control, wear protection and efficient power transmission.
Important functions include:
friction control
wear protection
efficient power transmission
The following elements can help identify lubricant condition:
.png?inst-v=71dc52cd-acdd-41e3-afaa-da1ecfb69f56)
Engine Operating Conditions
Understanding potential sources of abnormal engine conditions for gasoline, diesel, natural gas, and landfill/digester gas can better prepare you. This knowledge allows timely corrective action before equipment fails.
Potential sources of abnormal engine conditions:
.png?inst-v=71dc52cd-acdd-41e3-afaa-da1ecfb69f56)
Email or Print Reports
Select and view a report.
Select the Print or Email option.
If emailing, select recipients by searching email addresses.
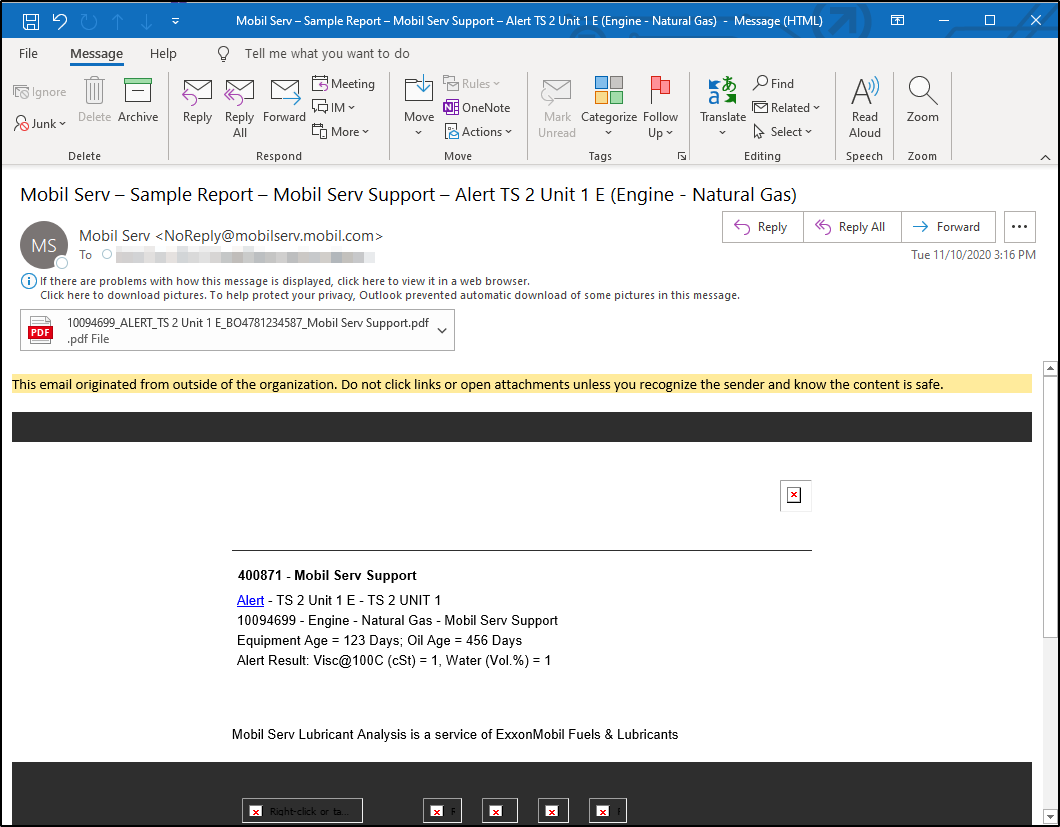
The sample report emails contain a concise summary in the bottom section. This provides further details about the asset. These details include the latest aggregate of engine hours, oil age, and particulars relating to the most recent alert.
Emailed sample reports should follow a specific naming scheme:
AssetID_ReportStatus_UnitID_SampleID_AccountName_ASSET DESCRIPTION.pdf
This clarifies which sample report is under review. As multiple sample reports can be delivered within the same email, this measure is taken to prevent any potential confusion.
Enable Summary Report Emails
Occasionally, users will receive summary report emails based on their profile settings. Initially, these are set to "Do not Email Summaries."
To enable:
Hover over the Default Sample Report Settings tile and select the pencil icon.
This brings up an option to "Send Email Summaries." Activate by selecting the empty box next to it.
Set your desired timing and intervals, and confirm by selecting "Save."
Once saved, the interval updates on the user's Default Sample Report Settings tile.
Summary: In the User Details screen, users can update default sample report settings.
Batch Sample Reporting:
In the User Details screen, users can modify default sample report settings.
"Per account" selection enables daily email summaries of sample reports for each batch.
Understand the following about Batch Sample Reporting:
The batch sample summary is dispatched once all lab results reach the 'Reported' status.
Sample reports in 'Registered' status delay the batch summary until all are 'Reported.'
After 14 days, 'Registered' status reports are excluded, and the batch summary is sent.
A recent update changed the logic to a 48-hour window from a 24-hour lab day for sending batch sample reports.
A 'batch of samples' references the total samples a lab receives within 48 hours for one account. For instance, the 48-hour period might start at 3:00 AM rather than midnight based on the lab's optimal start time.
Lab Day information
A 'lab day' is the period within which every sample is processed. Extended to 48 hours in 2020, it is necessary for Batch Reporting of Samples. It enables users to receive periodic email reports rather than upon each report's completion. Note: users can either receive individual or batch reports, not both.
The 'lab day' expires 14 days after the last day of a lab day. When it expires, all received reports are batched and sent. Subsequent reports that generate post the expired lab day aren't sent to end-users. Users must find these manually on the asset.
The 'lab day' commences when a lab gets the first sample for an account. This system is persistent, with a schedule established based on the first lab day for the account. For instance, if a lab receives samples on March 7th, 8th and 9th. The lab day could be March 7th-8th or March 8th-9th based on the initial lab day timing. The reception date of the customer's first sample determines the lab day. Developers can manually check this date via the ticketing system.